Using the Photos mode
The Photos mode is the main mode. It allows you to view and filter the photos, create and order collections of photos, as well as associate people, places, text, recordings, and other items with the photos. You can focus on a single photo, a collection of photos, or all of the photos. When focused on a single photo, you can use the full screen annotation features.
To use the Photos mode, click the photo icon towards the lower left of the MemoryMiner window. The default view in Photos mode allows you to work on numerous photos at once. The window should resemble the screenshot below, where numbered circles have been added to call attention to each part.
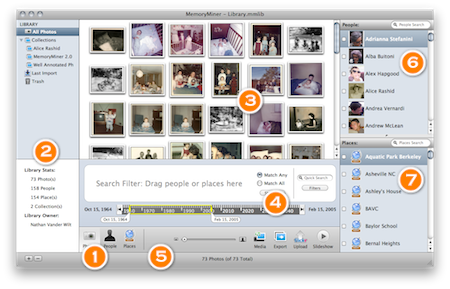
 Mode Buttons
These buttons allow you to switch between the Photos mode, the People mode, and the Places mode.
 Source List with Collections
The source list allows you to choose which collection of photos you wish to view and edit. Below the source list is an information section that shows statistics for All Photos, or allows you to edit and publish a selected collection. To add or remove a Collection, use the buttons below this information window.
A Collection is a group of any related photos, like an album or a photoset. Collections let you focus on a single story gathered apart from among all the photos in the library. Unlike the All Photos source, collections let you manually order photos in the Contact Sheet (descibed below) for slide shows and sharing, and have additional publishing features. To view a published collection, click its globe link in the information section below the source list.
 Contact Sheet
The Contact Sheet is where photos from the selected source will be displayed. You can browse through them and select which ones to edit, export, remove, or otherwise work with. When viewing a collection source, you can drag photos within the contact sheet to manually change their order. (In the All Photos source, the photos are always in chronological order.) The size of the photo thumbnails is set with the slider below.
To import photos, you can choose "Import Photos from Folder" from the File menu. Or you can drop individual files and folders into MemoryMiner's window from another application or the Media Browser. Most Mac programs support dragging, including the Finder and iPhoto.
To remove photos from the library, select them and choose "Move to Trash" from the Photos menu. They will then be placed in the library's Trash folder. When you select the Trash folder in the source list (described above), the contact sheet will show only the trashed photos. While viewing the Trash folder, you can return selected photos to the library with the "Restore" button. Clicking the "Empty Trash" button will completely remove all trashed photos from the library.
 Search Filter
The search filter allows you to limit which photos appear in the contact sheet above, specified by time, place, people, or text (i.e. titles and captions).
An enjoyable way to filter photos is to drag people or places from the lists on the right and drop them on the Search Filter. You can use different combinations of people or places. Clicking on a person in the Search Filter allows you to choose a specific period from that person's life. The "Match Any/Match All" radio buttons determine how the search criteria must match. For example, you can find the photos where two people are in the same picture by dragging both people into the Search Filter and clicking the "Match All" radio button. If you select "Match Any" instead, you additionally find photos that contain one person without necessarily the other. The "Show All" button clears the Search Filter and brings you back to the All Photos collection.
Below the Search Filter is a date range timeline, which can limit the photos you see by their dates. Drag the yellow window left and right to move the range, and grab its ends to reduce or increase the amount of time in the range.
On the right side of the Search Filter is the Filters button. This button opens the Additional Search Filters window, allowing you to further refine the search based on the items associated with the photo. For example, you can search only those photos which lack annotations or a date. This can help you find photos that need more information. Above the Filters button is a Quick Search input which searches the contents of the notes.
 Additional Buttons

The slider on the left allows you to adjust the size of the thumbnails of the contact sheet.
The Media button opens up the Media Browser, which lets you import photos, movies, music, and bookmarks by dragging them to the library window. The Media Browser works with both your iPhoto library as well as Adobe Lightroom. Because some versions of iPhoto and Lightroom do not save their libraries while running, it is highly suggested that you quit those programs before browsing the media from them. If the photos have keywords that match the Keyword Mapping entry in people or places, those people or places will be associated with the imported photo.
You may also load photos and files into the Media Browser, in order to preview them before bringing them into your library. To do so, drag files or folders onto the media browser window.
The Export button helps you share your stories with friends and family. Clicking it presents you with options to save the photos and an interactive web page to a folder, as well as upload the resulting folder to an FTP or MobileMe account. You can also access this feature with "Export/Upload Story" in the Photos menu, or by clicking the "Publish" button below a selected collection in the source list.
![]() The Upload button is for automated uploading to a Flickr account. Pressing it presents a sheet with options such as uploading only the selection, resizing the image, adding tags, and preserving associations to people and places. The uploaded images will be converted to JPEG format before upload. Note that these settings will affect only the images on Flickr, and not the images in the library.
The Upload button is for automated uploading to a Flickr account. Pressing it presents a sheet with options such as uploading only the selection, resizing the image, adding tags, and preserving associations to people and places. The uploaded images will be converted to JPEG format before upload. Note that these settings will affect only the images on Flickr, and not the images in the library.
The Slideshow button starts a slideshow, which presents the photos on the contact sheet, starting with the most recently selected photo.
 People List
The People List lists the people in the library. You can use the search box to quickly find people matching what you type. Press the Enter key while searching to add a selected person to the Search Filter. Checking the box next to any person will also add them to the Search Filter. Dragging a person to a photo will associate the photo with that person. Double-clicking the person will bring that person up in the People mode for focused viewing or editing.
You can import people by dragging one or more address cards from the Address Book program onto the People list. MemoryMiner will add the person and location mentioned in the address card. To remove a person, you will need to use the Delete button in the People mode.
 Places List
The Places List lists the places in the library. The People List lists the people in the library. You can use the search box to quickly find places matching what you type. Press the Enter key while searching to add a selected place to the Search Filter. Checking the box next to any place will also add it to the Search Filter. Dragging a place to a photo will associate the photo with that place. Double-clicking the place will bring that place up in the Places mode for editing.
You can also import places by dragging one or more address cards from the Address Book program onto the Places list. MemoryMiner will add only the location mentioned in the address card. To remove a place, you will need to use the Delete button in the Places mode.
Connecting Photos with People, Places, and more
To annotate a photo, double-click it on the contact sheet. The window will then change to focus on that single selected photo:
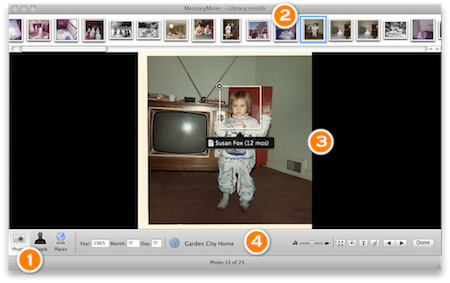
Modes Buttons
The modes buttons work the same as before.
Photos Row
The photos row is similar to the contact sheet, listing the photos in the collection which was selected. Clicking a photo will switch focus to it as the single selected photo.
Markup Section
The Markup section shows the selected photo, allowing you to associate People and comments with specific areas of the photo. To do so, drag a box (like making a selection on your Finder desktop) around the region you wish to annotate.
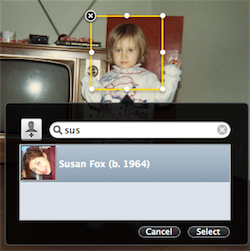
A popover panel will appear showing the People list, and allows you to search and select an existing person, or add a new one using the provided button. If you wish to only add a comment, press Cancel to dismiss the People panel and click the text icon instead. To reassign an annotation to a person, click the name to the right of the text icon and the People panel will reappear. To remove an annotation, click the remove button on the top left corner of its marker box and it will be deleted.
 You can zoom in on the people in a photo by clicking on the "step inside" icon that appears when you hover over an annotation box.
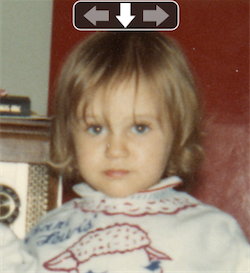
A navigation control will appear which allows you to move back and forth between people or step back out to see the entire photo. The slider with the hare and tortoise (in the Additional Buttons area) changes how quickly or slowly the zoomed navigation moves.
Additional Buttons
 The Year, Month, and Day fields allow you to set a date for the photo. You can leave question marks in a field if you're not sure of the exact year, month, or day.
 Clicking on the Place button or location name will show the Place panel. This panel allows you to search and select an existing Place, or you can use the provided button add a new one based on an internet maps search. You can edit the exact location of a place by dragging its marker to a new place on the map. To un-associate a Place associated with the photo, use the clear button that appears to the right of the Place name when your mouse is over it in the main window.
 The Speed slider controls the rate of the "step inside" navigation described above.
 The Full Screen button lets you annotate photos using your entire screen. After you click it, the Photos Row will autohide at the top of the screen and many of these Additional Buttons will be moved to a control panel available at the bottom of the screen. One additional button will be provided to let you control whether the People annotation boxes are hidden or not.
The Record button opens up a Video/Audio Recorder panel. Choose the correct audio source, and select which video source (or none) you wish to record from. Pressing the Record button will begin and end recording. After you have recorded your video or audio annotation, you will be asked to save the recording to a file which MemoryMiner will then automatically attach to your photo.
The Text Annotation button opens up a Text Annotation Panel, allowing you to add a title and comments to the photo.
The Attachment button opens the attachment viewer, allowing you to add video, music, or any other files to the photo.
Use the Arrow buttons when you are finished annotating the current photo and want to select the previous or next photo in the Photos Row above.
 The Done button saves the changes and returns the window to the default photos mode, seen at the top of this page.
Related Entries:
 Learn more about the People mode
Learn more about the Places mode
Learn about the MemoryMiner preferences