Using the People mode
People mode helps you focus on the photos and places associated with individual people through time. This is where you can edit the list of people that MemoryMiner knows about. In this mode you can import people listed in GEDCOM files, which can be exported from many genealogical programs.
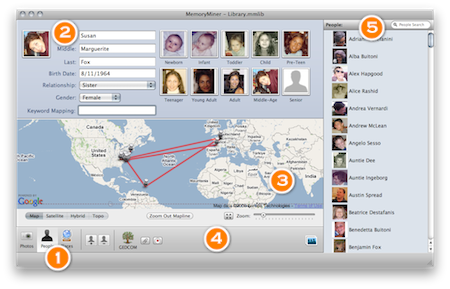
To use the People mode, click the people icon towards the lower left of the MemoryMiner window. You can then edit information and photos for one person at a time, and manage the list of known people. The window should resemble the screenshot below, where numbered circles have been added to call attention to each part.
 Mode buttons
These buttons allow you to switch between the photos mode, the people mode, and the places mode.
 Personal details section
The personal details section allows you to fill in the name, birthdate, gender and relationship of a person to the library owner. You may also edit the thumbnails for each stage in their life. MemoryMiner will always try to assign a default icon for each life period based on the date a photo was taken and the date when a person was born. Just like iChat buddy icons, MemoryMiner life period icons can be changed at any time. Simply click on one of the icons, and the Person Icon Editor window will appear.
The Keyword Mapping field allows you to enter a single keyword or key phrase. When photos that contain this keyword or phrase are imported from Lightroom or iPhoto, they are automatically associated with this person. You may only associate one keyword to a person in this manner.
 Mapline/Photos view
This area displays Places or Photos associated with the selected person, toggled with an additional button underneath. The Mapline and Photos views are described in more detail below.
 Additional buttons
The Create and Delete person buttons allow you to add a new person to the People list or remove the selected person from your library. To remove a person from the list, you must first disassociate their entry from all photos.
Click the "Import GEDCOM" button to add People to the list from a GEDCOM family history file. You will be able to select which people to import from among the entries in the chosen file.
You can attach files to a person with the "Add Attachment" button, or capture a new attachment with the Audio/Video recorder.
/
The button in the lower right toggles between the Mapline view and the Photos view. These two views are explored in more detail below.
 People List
The People List lists all the people in the library, or you can filter the list using the search box above. Click in the list to select a person to view or edit. When the Photos view is shown, dragging any person to the photos contact sheet will associate the person to the selected photos on which it is dropped.
You can also import people by dragging one or more address cards from the Address Book program onto the People list. MemoryMiner will add the person in each address card, and also add a new Place for each location address found. Use the Places mode to edit or remove these locations, which are named after the person and type of address.
Using the Mapline View
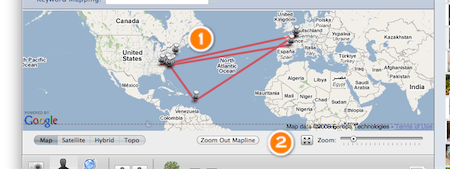
The Mapline view shows all the Places known about the selected person, connected in order through time. To switch from the Photo view to the Mapline view, use the toggle button underneath on the lower right. The window should resemble the screenshot below, where numbered circles have been added to call attention to certain parts.
Map
The Mapline for the selected person is displayed on an internet map. Its appearance and zoom level can be controlled with the buttons underneath (described below). Places in a person's life are shown by clickable pins connected in life order.
Place Photo Panel
When you click a pin, the map will zoom to that Place and a panel will appear to display the photos with the selected person at that location.
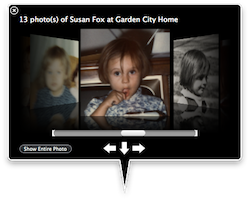
You can scroll through these photos (use the button underneath to see just the person or the entire photo), jump to the previous or next pin in the mapline, or jump back to the whole zoomed-out mapline. Clicking the close button on this photo panel leaves the map zoomed in.
Map Controls

The Map/Satellite/Hybrid/Topo selector lets you choose what style of map you wish to see.
 The "Zoom Out Mapline" button zooms the map in or out so that the entire Mapline fits nicely in view.
 The Full Screen button lets you view the Mapline using your entire screen. The Place Photo Panel and Map Controls are still available in full screen mode. This button will change its direction, and you can return to the normal window by clicking it again.

The zoom slider controls the detail level of the map.
Using the Photos View
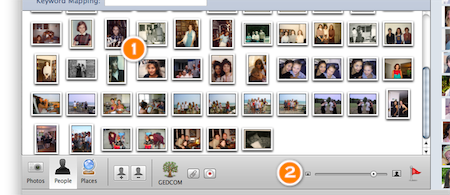
The Photos view shows all the photos that a selected person is associated with on a contact sheet. To switch from the Mapline view to the Photos view, use the toggle button underneath on the lower right. The window should resemble the screenshot below, where numbered circles have been added to call attention to certain parts.
Contact Sheet
The Contact Sheet shows all the photos associated with the current person.
You can associate People with Photos by dragging a name from the People List described above onto a photo or selection of photos in this view. If you want to disassociate the current person from a selected photo or photos, right-click the selection and choose "Remove Person From Selected Photo(s)" from the menu that appears. (Hold down the Control key while clicking normally to access any context menu via ctrl-click instead.)
Double-click a photo in the Contact Sheet to view or edit it in Photo mode.
People Mode buttons
 An additional slider appears with the Photos view; it adjusts the size of the photo thumbnails in the Contact Sheet.
Related entries:
 Learn more about the Photos mode
Learn more about the Places mode
Learn about the MemoryMiner preferences